Welcome to Android Facebook Integration tutorial series. This is first tutorial of the series and you will learn how to create developer account, create an app in facebook developer account, how to do it’s basic setup, generate Android Release KeyHash, generate Android development KeyHash using command and android application etc.
1. Getting started
We need some basic requirements for android Facebook integration into our android application. We will focus on those requirements now. Some important points that you are going to learn in this tutorial. How to
a. create facebook developer account, if you don’t have.
b. create app ID in developer account.
c. configure app to use it in android application.
d. generate KeyHash.
e. login using facebook SDK.
1.1 Create Facebook developer account
(i) Goto Facebook developer Account
(ii) Login or If you have not registered to developer account yet, then, you will see screen below.

Tutorialwing – Android developer account registration link
Click on the register button and accept the privacy policy. Then, press done. That’s it. Now, you are a Facebook developer. 🙂
1.2 Creating a new app
(i) Hover on My App (Shown as drop-down menu in right-top of the page). You will see Add a new App. Click on it.
You will see a dialog as shown below.

Tutorialwing – Android Facebook app create
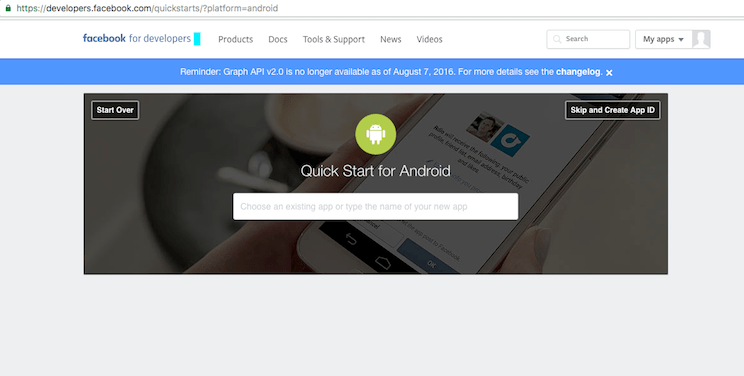
NOTE: If you see image below then,

Tutorialwing – android facebook choose platform
You can proceed in 2 ways.
a. A Dialog to create an app will be shown when you will click on Basic setup link given in dialog.
b. Choose Android as platform. Then, You will be shown images as below
Tutorialwing – android facebook app create with quickstart
Click on Skip and create App ID(Shown in right-top). Finally, A Dialog to create an app ID will be shown.
This is just to prevent showing quick-start guide. However, you may follow quick start guide. In this tutorial, we are not going to follow quick-start guide. So, It is strongly recommended that you follow either of 2 ways shown above if such dialog appears.
It is assumed that we are seeing dialog like below
Tutorialwing – Android Facebook app create
Enter Display Name, Contact Email and Select Category as shown below. Click on Create App ID. Then, you will be redirected to App Dashboard.

Tutorialwing – Android Facebook App DashBoard
Congrats, you have successfully created an app. Now, you need to do some setup to use it. 😀
1.3 Configure App to use in Android application.
In App Dashboard, you can manage your app, view analytics, Assign access of this app to other developers, see other statistics related to your app etc. Also, please do not share App ID, App Secret with others for security reasons.
Let’s start basic setup to use this app in android application. Finally, you Dashboard would look like below.

Tutorialwing – Android Facebook App Set up
1.3.1 Goto settings (Shown just below Dashboard, left side of the page). Scroll down and click on Add platform.
1.3.2 Select Android. Enter package name and class name of main activity of the application and click on save changes. You may get message dialog telling the problem to verify package name on google play. You just ignore this message because your app is still in development mode and you have not published it in google play.
Another important thing that you need to do is to generate KeyHash and add it in app settings. So, create android project, get the keyhash and add it.
1.4 Creating project
Follow steps written below to create a new project.
a. Goto File –> New –> New Project. Then, Write application name as FacebookIntegrationTutorial and click next.
b. Select Minimum SDK 15 or more –> click next –> Select Empty Activity –> click next –> click finish.
If you have followed above process correctly, you will be able to create a new project successfully
Since we have created a project successfully, we will start the basic setup for android facebook integration into this project.
1.5 Creating KeyHash for your login
To ensure the authenticity between your app and Facebook, we need to supply Android KeyHash for our development environment. There is a unique android KeyHash for each android development environment. If the app is already published, we should also add release key hash. For now, our app is not released, so, we don’t need release key.
You can create key hashes in 2 ways.
1.5.1 Through Command or
1.5.2 Through Facebook Android App.
1.5.1 Creating KeyHash for login through command
You can generate the keyhash using command line too. Just copy paste below code and press enter. Android KeyHash will be automatically generated.
MAC
keytool -exportcert -alias androiddebugkey -keystore ~/.android/debug.keystore | openssl sha1 -binary | openssl base64
Windows
keytool -exportcert -alias androiddebugkey -keystore %HOMEPATH%\.android\debug.keystore | openssl sha1 -binary | openssl base64
This will generate 28 character android keyhash corresponding to your development environment
Note: If your app is already published, you can generate release key using below command
Windows or MAC
keytool -exportcert -alias YOUR_RELEASE_KEY_ALIAS -keystore YOUR_RELEASE_KEY_PATH | openssl sha1 -binary | openssl base64
Replace release key alias and release key path accordingly.
1.5.2 Creating KeyHash for login through Facebook Android App
Open your project and follow steps below to create key hash.
(i) Open build.gradle and add maven central repository before dependencies
repositories {
        mavenCentral()
    }
(ii) Then, Add compile ‘com.facebook.android:facebook-android-sdk:[4,5)’ to your build.gradle dependencies.
(iii) Open your strings.xml file(i.e. res/values/strings.xml) and add below code into it.
<string name="facebook_app_id">YOUR APP ID</string>
Replace “YOUR APP ID” with the actual app id. You can get it in Dashboard.
(iv) Open AndroidManifest.xml file and add below uses-permission element into it.
<uses-permission android:name="android.permission.INTERNET"/>
(v) Add a meta-data element to the application element.
<application android:label="@string/app_name" ...>
    ...
    <meta-data android:name="com.facebook.sdk.ApplicationId" android:value="@string/facebook_app_id"/>
    ...
</application>
(vi) Now, Create a java class(Let’s say, MyApplication.java) and extend it with Application class. Write below code to Log the generated Hash key.
package tutorialwing.com.facebookintegrationtutorial;

import android.app.Application;
import android.content.pm.PackageInfo;
import android.content.pm.PackageManager;
import android.content.pm.Signature;
import android.util.Base64;
import android.util.Log;

import java.security.MessageDigest;
import java.security.NoSuchAlgorithmException;

public class MyApplication extends Application {

	@Override
	public void onCreate() {
		super.onCreate();
		printHashKey();
	}

	/**
	 * Method that prints hash key.
	 */
	public void printHashKey() {
		try {
			PackageInfo info = getPackageManager().getPackageInfo(
					"tutorialwing.com.facebookintegrationtutorial",
					PackageManager.GET_SIGNATURES);

			for (Signature signature : info.signatures) {
				MessageDigest md = MessageDigest.getInstance("SHA");
				md.update(signature.toByteArray());
				Log.d("KeyHash:", Base64.encodeToString(md.digest(), Base64.DEFAULT));
			}
		} catch (PackageManager.NameNotFoundException e) {
		} catch (NoSuchAlgorithmException e) {
		}
	}
}
If you have created project with different name, change the package name accordingly.
Make sure you change application name in AndroidManifest.xml file to this class name. So, your AndroidManifest.xml file would look like below
—————————
<uses-permission android:name="android.permission.INTERNET"/>

<application

    android:name=".MyApplication"

    android:allowBackup="true"

    android:icon="@mipmap/ic_launcher"

    android:label="@string/app_name"

    android:supportsRtl="true"

    android:theme="@style/AppTheme">


    <meta-data android:name="com.facebook.sdk.ApplicationId" android:value="@string/facebook_app_id"/>

————————
</application>
Output
Now, If you run your app, you will get KeyHash in Log cat.

Tutorialwing – Android Facebook App KeyHash
Copy the KeyHash and paste it in Android platform under app settings in facebook developer account.
1.6 Make your facebook app live to be accessed by public
Next work is to make your app public so that other people can get access to your app. If you don’t make your app public, people trying to login will get following errors

Tutorialwing – android facebook integration public access error
Goto App Review, and click on Yes button. to make your app available to public.

Tutorialwing – android facebook access, make app live
Note: If you want to use your app for development purposes only, you may not need to make it live.
This is the basic setup that we need for android facebook integration in our android application. Now, we can perform Login, Share content using facebook account etc. in our android application.
Conclusion
Android Facebook SDK is easily understandable and very useful when we want to promote our business via social media. We can use Android Facebook SDK in our android application to login, share content etc. Here, we have discussed about Android Facebook Integration – Basic setup to use different features of facebook sdk.
hello!,I really like your writing so much!
proportion wee communicate more about your article on AOL?
I require an expert onn this house to resolve my problem.
Maybe that’s you! Having a look forward to
peer you.